
This tutorial explains how to use an Arduino board as an AVR ISP (in-system programmer). This allows you to use the board to burn the bootloader and/or onto AT mega 328.
Full article with different options can be find here. Here, I’ve created a simplified copy of article for my workflow.
Steps
To use your Arduino board to burn a bootloader onto an AVR, you need to follow a few simple steps.
- Open the ArduinoISP firmware (in Examples) to your Arduino board.
- Select the items in the Tools > Board and Serial Port menus that correspond to the board you are using as the programmer (not the board being programmed).
- Upload the ArduinoISP sketch.
- Wire your Arduino board to the target as shown in the diagram below. (Note for the Arduino Uno: you’ll need to add a 10 uF capacitor between reset and ground.)
- Select the item in the Tools > Board menu that corresponds to the board on which you want to burn the bootloader(not the board that you’re using as the programmer). See the board descriptions on the environment page for details.
- Use the Burn Bootloader > Arduino as ISP command.
Connections
- From Arduino Board as ISP Pin D10 -> ATMEGA328 on breadboard Pin RST (IC pin 1)
- From Arduino Board as ISP Pin D11 -> ATMEGA328 on breadboard Pin D11 (IC pin 17)
- From Arduino Board as ISP Pin D12 -> ATMEGA328 on breadboard Pin D12 (IC pin 18)
- From Arduino Board as ISP Pin D13 -> ATMEGA328 on breadboard Pin D13 (IC pin 19)
- On Arduino Board as ISP 10µf (10-16V) capacitor between Reset and GND (Capacitor’s + pin into Reset, – into GND)
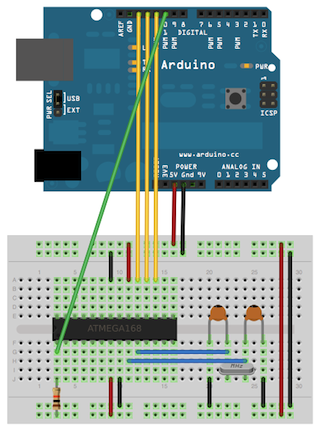
Using an Arduino board to program an ATmega, with external crystal and associated capacitors (18 or 22 picofarads).